Interfacing with UI #0 – Introduction

Over the past few years I’ve been slowly drawn into the user interface tasks that we encounter in our contracts and games. Some areas of UI design and construction have a lot of information written about them whilst other areas have precious little. With the aim of passing knowledge on I’ve decided to outline my experience over a series of UI related articles with the hope that it’ll help others working on user interfaces.

While I still have a lot to learn I’ve also learnt a lot of tricks that can help. I especially have a wealth of information in regards to the different frameworks and libraries that exist out in the wild, especially when it comes to Unity. I’ll be posting the links to the articles here as and when they are written to keep them together in one place.

If anyone wants to get in contact with me feel free to reach me at richard@roguevector.com or my Twitter at @CWolf.

Contents

The IOs of Game Netcode #2 – Threading and Concurrency

This is part of a series of posts revolving around game netcode development, the introduction and links to the other posts can be found here.


In the last post of The IOs of Game Netcode (found here), I talked about a few general rules of thumb I usually follow when starting a new netcode framework. Over the next few posts I’m going to go a little deeper into the technical options available to us as netcode developers and what routes I take based on different scenarios. The first topic I’m going to start with is threading, and the resulting issue – concurrency. This post is quite long so I’ve only addressed the issues the developer should keep in mind while working with threads. The solutions to these issues will be covered in the next post 🙂


Threading

As any netcode developer will know, the first hurdle you will hit when writing netcode or working with sockets is the threading issue. Normally, you can only execute a single piece of program code at a time. Threading allows you to execute multiple pieces program code simultaneously by running it on different threads. By default, reading and writing via sockets will block current execution of program code until it is complete. This isn’t necessarily an issue with writing to a socket unless you are writing faster than the hardware can handle (network card or modem), but if you’re reading, the operation will block until there is data to be read. One of the ways around this is to check the number of available bytes to be read before reading and if there are bytes available, only read that much. However, even with using this method, the actual reading and writing of bytes will block, even if it’s just a moment, and you don’t want this in your main game or render loop. Another way around this is to use asynchronous read and write operations. These run in their own threads automatically (provided by the socket library you are using) and pass the data back via a callback when complete. They have their uses, such as web services, but for real-time game netcode they can begin to cause problems as you cannot be sure of the order of transmission and you start to encroach of race condition territory.

So, in order to effectively read and write across a network with sockets, without causing the main program to hang while it is doing so, you’ll need at least one additional thread to perform the socket operations on. The reason I say at least one additional thread is because when developing your game client, you only really need a single socket to connect to your server. However, for the server, you’ll need a thread for every connecting client to handle each of the socket operations. For those of you who are now thinking “Why not use non-blocking sockets?”, I’m aware of this and it will be covered in a future post, but for the time being I’m focusing on the standard variety of sockets as there’s a lot more to consider with using non-blocking sockets 🙂

Anyway, as soon as you start working with multiple threads, it opens up a whole new bag of worms in the form of concurrent modifications.


Concurrency

Concurrent modifications are when you are reading a value of a variable in one thread, while it is being modified in another. Another example is looping over a collection while different thread is adding or removing an element from the collection. Most languages languages allow this type of access with unpredictable results. This is due to two main reasons.


Race Conditions

The first is the race condition, you just don’t know what thread is going to access the variable first. There are three scenarios for a race condition:

  • Read & Read – Both threads want to read the value of a variable. It is unknown which thread reads the variable first but it doesn’t matter as it does not change. Both threads read the same value.

  • Read & Write – One thread reads the variable, while the other writes to it. The final value of the variable will always be what is written, but the value read by the reading thread may be that of the variable before the write, or after. This can lead to the aforementioned unpredictable behaviour and potential crashes.

  • Write & Write – Both threads want to write. No read operations are carried out, but that does not eliminate an unpredictable value being read later. This is because the final value of the variable is unknown. It is the value of whichever thread wrote to the variable last.

The above scenarios are very specific and only show two threads accessing a single variable. However, in reality, these threads would be doing more than just reading and writing to a variable. For example, we have a shared (global or static) float variable called currentSpeed accessed by both threads:

Thread 1 – Anti speed-hacking protection

currentSpeed = player.getVelocity().getMagnitude();
if (currentSpeed > MAX_PLAYER_SPEED) {
    player.disconnect();
}

Thread 2 – Find the fastest moving entity

Entity fastestEntity = null;
currentSpeed = 0;
for (Entity entity : entities) {
    if (entity.getVelocity().getMagnitude() > currentSpeed) {
        currentSpeed = entity.getVelocity().getMagnitude();
        fastestEntity = entity;
    }
}
return fastestEntity;

For the record, you should never share a variable between two different tasks like this, but if you did this is how it might play out. For this example we are going to assume that the player is moving at a speed of 4 and there is one other entity in the world moving at a speed of 10:

// Start with Thread 2
Entity fastestEntity = null;
currentSpeed = 0;
for (Entity entity : entities) {
    if (entity.getVelocity().getMagnitude() > currentSpeed) {
// Switch to Thread 1
currentSpeed = player.getVelocity().getMagnitude();
// Switch to Thread 2
        currentSpeed = entity.getVelocity().getMagnitude();
        fastestEntity = entity;
    }
}
// Switch to Thread 1
if (currentSpeed > MAX_PLAYER_SPEED) {
    player.disconnect();
}

In this scenario, the first time currentSpeed is assigned is after the first switch, where it gets set to 4. Before it can test the value of currentSpeed, the process switches to thread 2, where currentSpeed is set to the value of the fastest moving entity’s speed, which 10. Then the process switches back to thread 1 to perform the test. Oh look, the player is moving at a speed of 10, they must be speed-hacking, better disconnect them!

This occurs because the threads can switch at any point in during normal processing and is always something you need to keep in mind while working with multiple threads. There are mechanisms to get around these issues, but first…


Non-Atomic Operations

The second reason concurrent access can cause unpredictable results is due to non-atomic load and store operations. This is a bit more low level and might be harder to grasp for those who aren’t familiar with CPU architecture. There are a couple of definitions when it comes to the atomicity of an operation. It can refer to a single instruction or an operation of multiple instructions. Essentially, an operation is considered atomic if it completes in a single step relative to other threads. Therefore, a non-atomic operation can also result in a race condition as described above, but for the purposes of this section, we’ll be focusing on single instructions.

When you want to run your game (or program), you need to compile it into machine code first. Every developer knows this. During the compilation process, the compiler reads our source code and optimises it internally before outputting machine code, therefore the machine code doesn’t directly reflect the logic that we’ve defined. Most developers know this. One of the optimisations compilers do is to maximise CPU register usage. General purpose CPU registers typically have a size equal to the bit-architecture of the system. Modern day systems are 64 bit architecture and have 64 bit general purpose CPU registers. If you have two 32 bit integers that have some operation performed on them, the compiler will attempt to optimise the machine code to load them both into the same 64 bit register to perform the operation more efficiently. Some developers know this.

Now, the problem lies in the scenario where you attempt to perform an operation on a data type that has a larger bit requirement than the CPU register can handle, or the register already has some active data in it. The data ends up being split into multiple machine code instructions – and this is what causes the problem. Can you remember when I mentioned that threads can switch at any point in normal processing? Well, this happens at the machine code instruction level. So, a simple variable assignment such as:

long timestamp = 1L;

Can be split into two machine code instructions, with a thread switch right in the middle.

Not many developers know this.

This is the very essence of non-atomic operations. If processing switches to another thread during a multi-instruction load or store, the race condition is the least of your worries. Depending on your operation, you’ll either end up with a torn-read or a torn-write. One thread attempts to write a 64 bit integer to a variable but only gets as far as the first 32 bit store instruction, another thread reads the full 64 bit contents of the variable, then the first thread writes the second 32 bit store instruction. What the second thread ends up reading is one-half correct data, one-half bad data and one-whole big problem.


Some of you may now be thinking “Holy crap, threads are dangerous, how the hell do programs even function without exploding into a flaming ball of random corruption!?” Well, the answer is yes, they are dangerous, but there are also certain principles you can abide by and mechanisms you can use that prevent this pseudo-random behaviour. However, these topics will be addressed in the next post 😉

Like before, if you have any questions about this post or just want to chat netcode, please comment below or fire me a tweet at @Jargon64.

Thanks for reading! 🙂

The IOs of Game Netcode #1 – A Few Rules of Thumb

This is part of a series of posts revolving around game netcode development, the introduction and links to the other posts can be found here.


First of all, welcome to the series! 🙂

This first instalment of The IOs of Game Netcode will cover a few rules that I’ve come to follow whenever I approach a new netcode project. Now, as I’ve been writing this I’ve come to realise that because netcode is mainly backend code, there isn’t going to be a whole lot to look at except large walls of text. I’m afraid I can’t do much about that. Hopefully, you find the posts interesting enough to persevere 🙂 So, without further ado, here are my rules of thumb…


Text is BAD

What I’m referring to here is text-based netcode serialisation is bad and you shouldn’t do it. If you do it, then you are a bad person and should feel bad. Of course, there are exceptions to this rule. The first being web services, which in all fairness is a pretty big exception. Turn-based games can get away with it as well. Also, you may not have a choice if you’re developing a mobile game due to unreliable Internet connections and are forced down the RESTful web-service route here too. I’ve played a few real-time multiplayer mobile games and they’re alright, if you’re on wifi, otherwise it’s a terrible experience.

So, if you don’t fall into one of the above exceptions, you’re going to want to go with object serialisation at least otherwise you’re going to get a lot of overhead on parsing your netcode into usable formats. Now, for a lot of you this is pretty obvious and you may be asking yourself “Why would any sane person try and implement a real-time game’s netcode with text-based serialisation?” Well, for some of the more inexperienced developers out there, it may seem like a good idea to use a flexible text format like XML or JSON for your netcode because “everything can read it” and “other people can write clients to consume it like a web service”. Just save yourself the headache and stop yourself now.

If you haven’t guessed, yes, this is something I chose to do while developing Root Access. This was a long time ago now and what roped me in was the flexibility, you don’t need to deserialise everything you receive and different clients can select only what they need, but this was an inexperienced train of thought. Of course you want to deserialise everything, if you don’t you clearly don’t have efficient netcode. Even though it did work, and pretty well at first, it got progressively slower the more data we shoved through it. Eventually, I went back and recoded all of the netcode to use Java’s object serialisation framework, which took a long time and was a massive headache. So save yourself the trouble and don’t do it! 🙂


Everything is Multiplayer

It is my firm belief, that if you are making a game with multiplayer, you should bite the bullet and make your singleplayer multiplayer. What I mean by this is your singleplayer is actually a private multiplayer session consisting of one player using the system’s local loopback interface. Of course, this basically means you need to START with your netcode framework before you can make any kind of progress. Yes, this does slow down the initial project start quite considerably and also makes developing the singleplayer aspect of the game a bit slower and require more effort, but I believe the benefits are definitely worth it.

For starters, you’ll finish your game faster. If your singleplayer and multiplayer modes use exactly the same code, then you’re killing two birds with one stone. All you have to do is flip a switch and you go from singleplayer to multiplayer and vice versa. Writing two separate systems to manage singleplayer and multiplayer will just be a maintenance nightmare down the road. There shouldn’t be any latency issues running singleplayer through the loopback interface. If you are experiencing any kind of noticeable delay while playing a local singleplayer, this just points out that there may be an issue with your netcode design / implementation, forcing you to fix it and resulting in a better multiplayer experience as well! 🙂

Lastly, and this is the big one, you’ll avoid the gargantuan headache that is retrofitting multiplayer into your game. If you focus on singleplayer only to get your game out as soon as possible, with the idea of multiplayer coming much later on, you’re in for a world of hurt. I’ve seen so many game developers do this as well, and it basically appears that they’ve hit a brick wall in terms of progress because they are so busy behind the scenes refactoring, debugging and generally rewriting a huge portion of their game. I was actually impressed when the guys at Mojang managed to retrofit Minecraft’s singleplayer into a multiplayer system to support LAN play, but it required huge changes including the way their singleplayer stored its map and player data. So, if you’re planning multiplayer at ANY point during a game’s development, DO IT FIRST! You’ll thank me later 😉


Stand Alone, Together

Now this one may not be as obvious and a lot of people may actually disagree, but I think it’s something that can help a game’s design, development and maintainability. When writing your multiplayer framework for your game, separate the game client and server into separate projects, and also build them as separate binaries. It may be tempting to implement your multiplayer server into your game client as it’s easier to work in a single project, especially if the game doesn’t really require a dedicated server. Do it anyway. The reason I say this is because you’re going to end up with a lot of duplication, particularly in regards to the game data (which is understandable due to the client and server’s own knowledge of things). If you’re not careful you’ll start cross-referencing data without going through the netcode properly and before you know it, your multiplayer isn’t truly multiplayer and it’ll be a development and maintenance nightmare.

If you do separate your client and server into separate projects, but plan to compile and distribute together as one application, then I don’t really see a problem with this. I just prefer to go all the way and build as two separate applications, then you have a dedicated server from the beginning. Then for locally hosted games, you just get the game client to launch the server in the background, telling the server that the player is the host / has admin privileges by providing a player’s token or account ID to the server process. This also works for singleplayer games as mentioned in the Everything is Multiplayer section raised above, just you keep the game private, skip the game lobby screen and launch straight into the game.

What I have suggested so far makes the assumption that your client and server are written in the same language. If they’re not, then you’ll probably never encounter these issues, but there is also an advantage of working in a single language and that is shared projects. Back in the day when we were very much Java, Java, Java we usually started a new game with the same triad of projects. Client, server and shared. The client and server were dependent on the shared project, which housed all common functionality between the client and the server. It included the netcode framework, netcode commands and data structure classes. This removed a whole tonne of duplication in the projects and is something that worked very well for us while we worked in a single language. It’s a lot harder to do when you work in Unity and C++ :). Anyway, since those days, I’ve refined my thinking a bit and come to the conclusion that sharing the netcode framework and potentially the data structure classes is potentially a bad idea, and that only the netcode commands should be shared.

If you share your netcode framework you have to start writing in special cases depending on whether the process using the framework is the server or the client, as well as identifying the source of a netcode command (whether it is the server or a client and how to handle it). I actually saw someone tweet a code snippet that made reference to this exact check recently and, to be honest, I don’t think it’s needed. Of course, there’s always an exception to the rule. If you’re developing a peer-to-peer model, then you may not have a choice, depending on how your client gets its peer list. Anyway, the reason I mention that you shouldn’t be sharing a data model either is because your client should never know everything your server knows. The client should only know portion of your server’s game data, only what is relevant to it. Also, you should only be sending client required data for each entity class. Your server versions of the entity classes will contain a lot more and some of it may be sensitive. Your server’s game data classes will also contain a tonne of functionality regarding how the entity behaves, that the client should never need. If it does, then your design is wrong as your server is not fully authoritative and then you have another whole lot of problems, such as players being able to headshot everyone in the server with a press of a button or players setting their own stats (Yes, I’m looking at you Battlefield).

Some of you may be thinking “I don’t see the problem, I’ll just create pure abstract data classes with only the common data between the client and server, with no behavioural functionality. Then subclass in each of the client and server projects”. By all means, you can do this. I just find this to be a pain because you end up maintaining three data structures.


Anyway, this post has gone on far longer than I thought it would so wrapping it up now. Sorry for that, I’ll try to keep future posts more concise and maybe provide code snippets to illustrate my points 🙂

If you have any questions or just want to chat netcode, just comment below or fire me a tweet at @Jargon64.

Thanks for reading! 😀

The IOs of Game Netcode #0 – Introduction

I’ve done a lot of coding over the years and learnt a substantial amount, either through reading tutorials, looking at examples, trial and error, reverse engineering, etc. So I’ve come to think I have a wealth of knowledge regarding the subject these days.

For a long time I’ve been thinking that I’d like to give back in some way. So after some thought on what I could share I’ve come to realise that nearly all of the games and other projects I have worked on have networking implemented in some form or other, and for the most part, this has all been developed from the ground up with very little library use (you can take this as good or bad, probably a bit of both). Also, it hasn’t just been the same type of networking. Infact, it ranges all the way from XML serialisation to binary serialisation, and everything in between.

Now, I don’t consider myself a guru on the subject, but I’d like to think that I have an advanced level of knowledge on it. So, I’ve decided to create a series of posts based on my experience on game netcode development and what I think is the best way of implementing game netcode as well as the issues that I ran into that led me to think this way. Hopefully, some of the game devs out there will find what I will be sharing useful and maybe beneficial to their current projects!

I’ve decided to call the series The Ins and Outs of Game Netcode or shortened The IOs of Game Netcode. Now remember, these are my opinions based on my experiences, so don’t take it as fact. I don’t think there is a single right way to do it, but I’ll be sharing what works for me and how I do it.

This introduction post will also serve as a contents page (with links) for the series. So stay tuned 🙂

Contents

Unity Development: Monitors – Part 2

This is part two of an article series for Unity Development on an interactive computer / monitor system. See part one here.

Over the past two months I’ve been slowly continuing with the Monitor system that I’ve decided to name ‘Farseer’. My last blog post ended with some open questions regarding the various design choices I faced, such as how to lay out the monitor’s view in the scene space. To quickly sum up I had two choices.

  • Place the monitor views outside the viewable scene space
  • Place the monitor views on the actual monitors but on a non-viewable layer

After some thought I decided to go with the second option. I felt this would ultimately be the best approach as it kept things spatially together. I discussed my choice with a few of our community members and they seemed share my opinion.

Now that the above issue was decided on… what was next? I felt that I had taken the current approach as far as I could and it was time for the next step. With this, Farseer finally was elevated to its own project! (I tend to prototype in a common project as it saves some time setting things up again).

farseer

My intention for Farseer has always been for it to be used in a procedurally generated game. The system will need to work well being accessed by various game systems, however, I didn’t want to limit how the system could be accessed. I wanted Farseer to be useable in the Unity editor too and so, with those thoughts in mind, I set off again!

As soon as I had made my mind up to make Farseer as flexible as possible, I hit another design choice. Should I use prefabs for the monitor objects, or not? Think of Prefabs as a ‘here’s one design made earlier!’ approach within Unity – a design of an in-game object previously set up by the developer. Unity development tends to encourage heavy use of prefabs and with good reason. They make development a lot less complex and messy. If I decided to use prefabs I would create ‘monitors’ of various sizes for use. A developer could then create one of these monitors that best fit their needs. My only concern was that I had previously encountered some issues involving the interaction of prefabs and RenderTextures (the flat 2D ‘live’ image view of what the monitor is looking at). In the end I had two choices – use prefabs or use a non-prefab, more code based approach.

Prefabs

I initially decided to pursue the prefab approach but I hit various issues that made me backtrack. The issue I encountered was that the Unity Material (something that helps define how an object is displayed in game) assigned to the monitor prefabs and Mesh (effectively the 3D model) seemed to be shared between all prefab instances (an instance being a ‘constructed’ version of a prefab).

In hindsight it was probably user error on my behalf. I was sharing a lot of Meshes for the monitors and this was probably causing the problems I saw. Ultimately, this meant that if I tried to changed a Shader effect on a monitor instance, it would change it for all instances of that monitor prefab. I realised that to make Farseer as flexible as possible I shouldn’t create monitors of various sizes as this approach is inherently limited.

So… with my new found knowledge (or so I thought) I took the more code based approach. I would generate the monitors as and when required using the required dimensions. This involved a bit more work but it was more flexible in the end, and by using Unity Editor plugin coding I was able to use Farseer in the Unity Editor too!

Menu

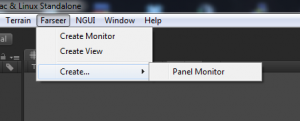
I plan to have preset monitor types that can be quickly created without a lot of effort but I also wanted to provide finer control over the system. I thought a two stage system of ‘Create Monitor’ then ‘Create View’ satisfied that need.

CreateMonitor2

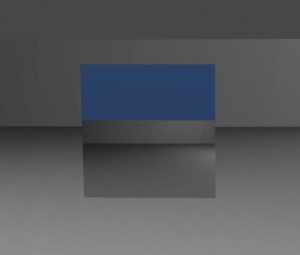
CreateMonitor

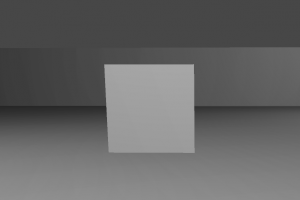
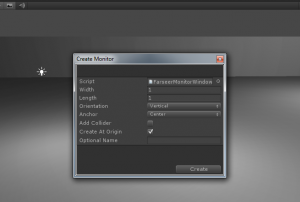
Looking at the pictures above, ‘Create Monitor’ concentrates more on the creation of the Plane / Mesh (effectively the 3D representation of the monitor) and it also generates the most suitable RenderTexture to fit the custom monitor size / dimensions. Once created you can see the beginnings of a monitor!

CreateView2

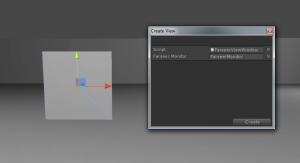
CreateView

Again with the above pictures, the ‘Create View’ concentrates on creating the actual ‘View’ and linking it to the 3D monitor.

Taking a deep breath… that’s where I’m up to right now. It has less ‘pretty’ functionality than where I was at in the last post but my next step is to reintroduce the interactive sections I already have working. I don’t have any real blockers right now other than finding the time in between our contract projects to dedicate to Farseer. I’ll post another update once I’ve made more progress!

Until then – thanks for reading!

Heads Down Working Hard

This past month has been crazy in terms of development. Our contract artist has produced some excellent art that I’ve been concentrating on getting into Mechadroids. All the main features of the game are now in place so I’m wrapping up the loose ends. After that we’ll be ready for our next alpha release. Seeing how that goes we’ll then release it out onto Google Play (Android’s Market) as a beta!

We should have some exciting news to share in a few weeks time so I’m really looking forward to sharing more news soon! Ok… time for me to get back to work!

Bit of Alright Conference

I’m going to be taking a small break from coding on Friday to attend the ‘Bit of Alright‘ indie developers conference in London. I’m really looking forward to this as it’ll be a great place to meet other developers and pick up useful advice! I’ll be flying out tomorrow (Thursday) night to London then spending some time seeing friends and family. I really can’t wait as this will be the first trip back to the UK since leaving for Germany.

After that it’s back to Mechadroids! I’ll let you all know how the conference was when I get back home. Until then!

Jargon Dares Too!

So, I have decided to enter the Ludum Dare Mini along with my esteemed friend and colleague, Mr CWolf, which is happening this weekend (21st-22nd Jan). I wasn’t sure whether I would be doing it, even though I desperately wanted to, due to time issues. While working on Deadworld Studios, I’m also doing some web development on the side and all the coding is beginning to take it’s toll. That being said, I can’t let CWolf have all the fun and I have been meaning to do one of these since University (unofficially tried my hand at a 24 hour challenge, it didn’t turn out too good).

Anyway, as CWolf has mentioned, the theme is fear and while he is going for an ambient psychological approach, I have decided to go with a more of a technical approach (as I usually do). Mostly because I don’t think I can create the level of immersion a player would need to truly feel fear, although CWolf seems to have latched onto a good idea. I can’t say too much about my game because it is a bit of a one-trick pony and once you know what to expect, it will lose it’s power.  I guess it will work on the principles of fear of the unknown.

There’s not much time for prep work and I’m still feeling a little wound tight due to our recent Mechadroids update and the web development work I’m doing, so there is a good possibility I’ll be taking the next few days off and winging the whole thing… what could go wrong!? 🙂

Oh, another thing. Myself and CWolf will be synchronising our start for the Ludum Dare Mini.  We’ll be starting at 8pm (UTC + 1), 1 hour later than CWolf stated, on Friday 20th Jan, which is actually 6am Saturday for myself. Also, there’s a small chance of a dual stream going on, depending if we can work out how to do it.

Ludum Dare Mini (Jan 20th – 22nd 2012)

Last week I decided to enter the upcoming (and my first) Ludum Dare Mini! This is my first Ludum Dare event ever so I’m starting to get a little nervous with the lead up to it. For those of you who don’t know what a Ludum Dare event is here is an extract from their site…

“Ludum Dare is a regular accelerated game development Event. Participants develop games from scratch in a weekend, based on a theme suggested by community.”

So for the usual LD event it lasts over 48 hours and the next mini event is this coming weekend (21st – 22nd of Jan). The main difference between the LD minis and LD main event is this that the rules are a little more relaxed in regards to release of source code, timeframe and declaring tools/frameworks/reuse of code for minis. I think this will be ideal practice for the main LD event in April I intend to enter.

So… this LD mini’s theme is fear! I’ve decided to make more a psychological game based around fear – use of music and dark will be pretty important. I’m drawing pretty heavy inspiration from games in the Silent Hill series. I’ve decided to use Slick2D with my own framework built on top of it since it provides a nice graphical game support for the crucial visual experience of my idea.

Since the 48 hours is flexible I’ve decided I’m going to start mine at 7pm UTC+1 on the Friday 20th of Jan and finishing at 7pm UTC+1 on the Sunday 22nd of Jan. I will be live streaming the entire event (except when I’m sleeping) at my live stream site of http://twitch.tv/cwolfs so feel free to drop by and wish me luck! Also feel free to jump into our IRC channel at irc.globalgamers.net #deadworld to show support / ask questions. I’ll probably be more responsive there than on the live stream chat.

Why am I doing this? Practice to be a better programmer in some aspects, learn more, the experience, to be able to say I’ve done one and… why not? Wish me luck and I’ll see you on the stream (or IRC earlier!).

Fulltime Developer Day #1

I’ve finally moved to Germany and managed to unpacked all my things (in record time too!). Today is the first day I’ve had a chance to really think about DWS and gamedev for a while. Jargon and I had a meeting last week to figure out what’s left to get done for the next update of Mechadroids so I’ll be doing my side of that today. This week I want to brush the cobwebs off the systems and see what needs to be done to get us running at fullspeed. Short but sweet post for today – we’ll be keeping you updated.

Interfacing with UI #4 – Coherent UI

February 5th, 2016

This is part of a series of posts revolving around user interface design and development, the introduction and links to the other posts can be found here. Last I wrote about user interfaces I discussed the new Unity UI system and I wrote about our process of porting from Daikon Forge to it. That was a year and a half ago and a lot has changed since then. To keep things interesting we decided to move from Unity UI (yet another move?!) to Coherent UI and I’ll explain why we did it. Why Move… Again?!... (read more)

@SolitudeGame: Status update: Fuel reserves low. Asteroid mining facility detected on sensors. No response to our communications. On approach station appears to be abandoned and running on emergency power only. Away mission approved. Mission objective: Search and salvage - fuel is a priority.

23/03/2022 @ 11:00am UTC

@RogueVec: And so it begins! #RebootDevelop

19/04/2018 @ 8:05am UTC

@RogueVec: We'll be at @RebootDevelop this year. We can't wait! If you want to hang out just give us a shout! #RebootDevelop2018 #GameDev

16/04/2018 @ 12:06pm UTC

@SolitudeGame: Fullscreen terminals allow you to hook into your ship's guns for fine control! Moddable gun modules, terminals and UI! https://t.co/B5N01jrA70 #GameDev

8/12/2017 @ 4:58pm UTC

@CWolf: Woo! And, now we have a cross-compiled (nix --> win64) @SolitudeGame server in our build and deploy pipeline #RV #GameDev

28/11/2017 @ 3:39pm UTC