Interfacing with UI #4 – Coherent UI

This is part of a series of posts revolving around user interface design and development, the introduction and links to the other posts can be found here.

Last I wrote about user interfaces I discussed the new Unity UI system and I wrote about our process of porting from Daikon Forge to it. That was a year and a half ago and a lot has changed since then. To keep things interesting we decided to move from Unity UI (yet another move?!) to Coherent UI and I’ll explain why we did it.

Why Move… Again?!

Changing UI library is no small task and it’s definitely not something to be undertaken lightly, especially twice in the same project. So… why did we move? Ultimately it came down to two main points.

We found Unity’s UI was not up to standard at the time

When Unity UI came out I started porting our mod tools over to it. Whilst doing this I encountered a lack of functionality and lots of bugs. The framework was far from mature and lacked a lot of features and functionality you would come to expect from a UI middleware. Unity open sourced it, which was a great move, but even today there is functionality and features missing and the workflow just didn’t fit what we wanted.

We needed a mod friendly UI system

This is an especially important point. As you may know by now flexible mod support is one of our core design pillars for Solitude and Unity UI just isn’t mod friendly one bit. It’s heavily Unity Editor based and, while you can set up the UI at runtime, it takes a lot of code to achieve simple, reliable results. We needed something that modders could easily edit, play around with and get into the game. The only way we could manage that would be for us to write a layout tool as part of the game mod tools and a converter for changing this custom layout format into Unity UI. To be blunt – that wasn’t going to happen. We’re too busy with critical features as it is so having to write a UI converter would be too much work for us.

So I decided to expand our search which lead to me find Coherent UI.

Coherent Labs

Coherent UI

Coherent UI is a user interface middleware developed by Coherent Labs. It integrates a wrapped chromium renderer (think: Chrome web browser) to provide HTML, CSS and Javascript support for user interfaces. I took to my research and after a few example projects I quickly realised how perfect for Solitude this would be. This was in January 2015.

Coherent provided loading of UI in the form of HTML, CSS, Javascript, the bindings and hooks for linking the renderer into Unity but it didn’t provide any kind of complex framework for controlling all these. To keep inline with our mod support design pillar we needed a flexible system for modders to define user interface components that can be loaded and removed from the game. It took us a few weeks of solid development effort but after we had finished we had a framework that allowed us to create user interface components and bind them to the game. Not just that! We were able to separate the UI logic from the components so the UI logic stayed in the Lua mod scripting layer and the pure view stayed in the JavaScript code.

This framework proved to be very flexible and allows modders to inject their UI mods into the core Solitude game, or provide UI functionality for more extensive mods they create all in a well known format. It even allows for real web browsing! (We’re limiting that for the core game but modders are welcome to unlock it with a simple change).

The downside to Coherent UI was that it is closed source and is expensive for a small company of our size. For a larger company it’s very reasonable in cost. At the time we took the subscription approach with the intention of upgrading to a full game license when we had the funds for it.

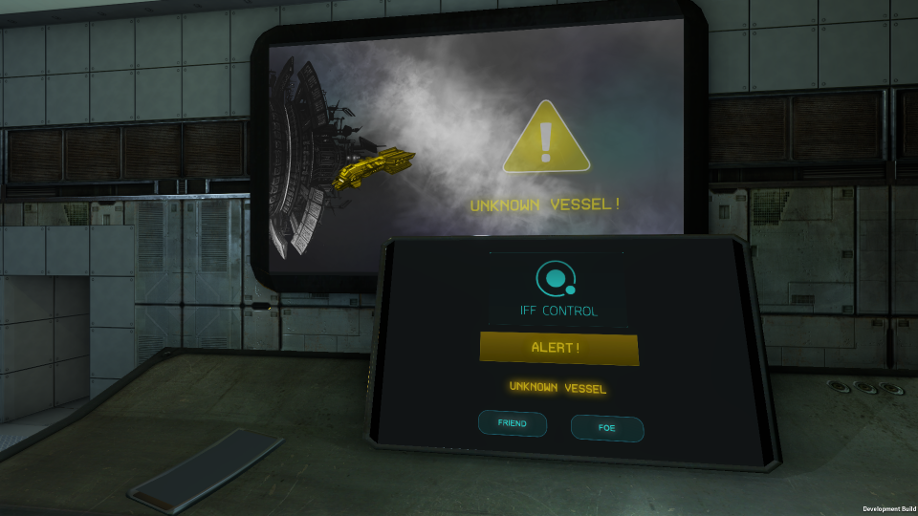
So, what else could we do with Coherent? Well… it allowed us to truly get the most out of Solitude’s terminal system. Solitude Tech Demo 1 had terminals but they were more faked as they weren’t sync’ed up for multiplayer support and they were definitely not moddable. So with Coherent it allowed us to get to our Terminals 2.0!

Terminals

As we were pushing Coherent hard we started to feel some performance issues in two mains areas. We plan to have a lot of these terminals in one area at any one time and we intended to show in-game video feeds (view screens) on them too. Both of these areas were causing us performance issues and were a cause for concern. Coupled with that, Coherent informed us that the subscription tier was to be end-of-life’ed and, after the time extension they offered us, we would have to upgrade. Since a time extension of a year wouldn’t cover us for the release of Solitude we decided to upgrade with the subscriber discount they provided.

Coherent GT

During this time Coherent suggested we try their new version of Coherent called Coherent GT. This apparently brought with it a lot of performance improvements so I spent some time investigating it. I was very happy with what I found as it solved both performance issues that were a concern for me only a few weeks earlier! With that, we fully upgraded to Coherent GT! This allowed us to fully implement viewscreens in Solitude.

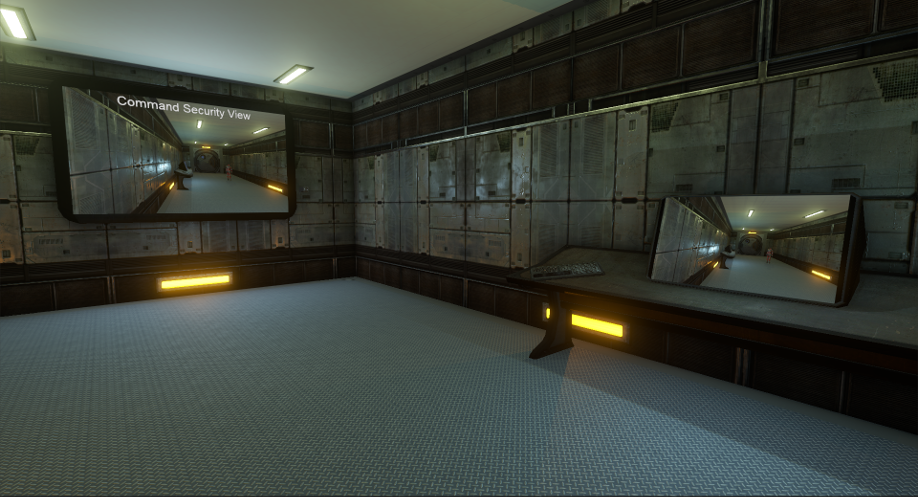
The terminal viewscreen feed is fully embedded in the terminal HTML (DOM) structure, so you can easily manipulate it with JavaScript and overlay any user interface on top of it like you usually would on the terminals. Here is a very basic example of an in-game camera module on the wall (it’s to the right of the large viewscreen) with the view being shared between two terminals with the viewscreen feed on it and a basic overlay.

View Screens

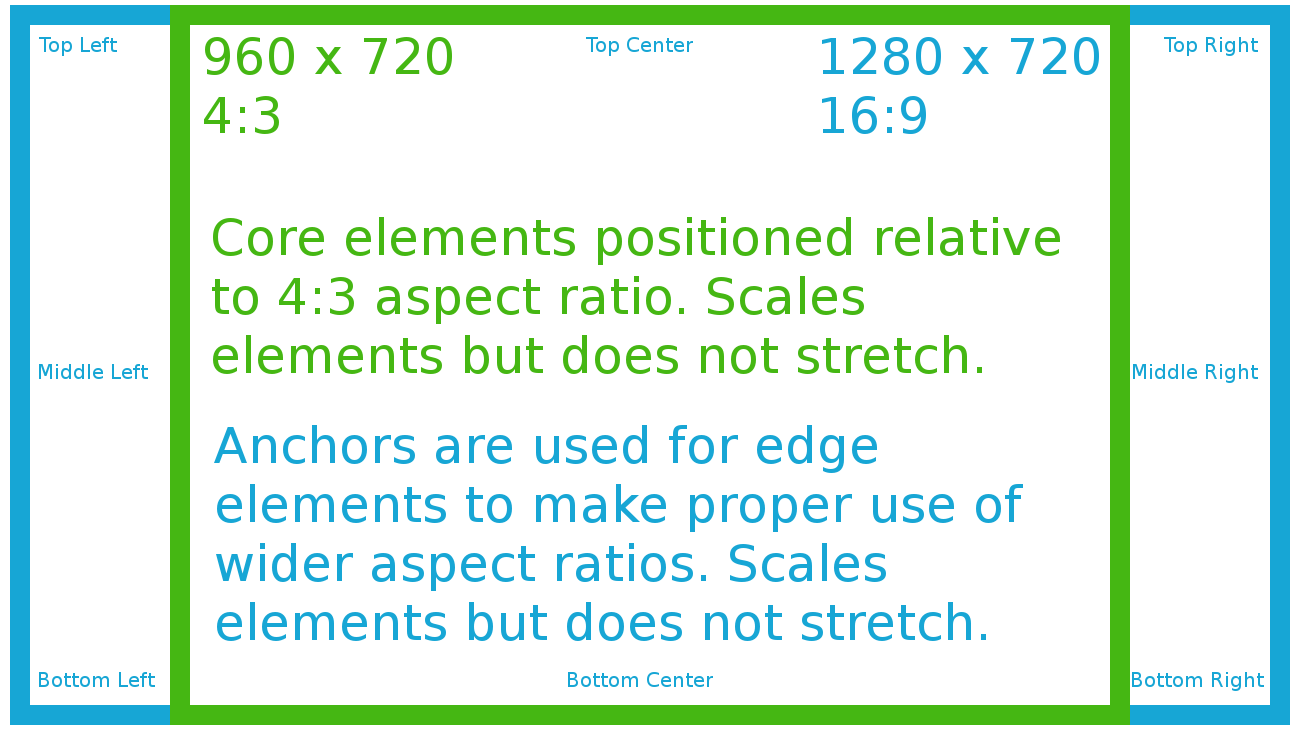
So there we have it. We’re not changing UI system again and Coherent is, without a doubt, the best fit for us. We get to use a technology that mastered scaling and aspect ratios long ago (web development), access to all the Javascript libraries that exist, a fast and multi-core UI renderer and a system that is fully moddable. Sounds like a win to me.

I’ll make another post to go into the terminal system in more detail as there’s a lot of things going on there. Hopefully you found this interesting and, like usual, comment, email or grab me on Twitter at @CWolf.

Thanks for reading!

Mod Support #2 – Embedding Lua into C++

This is part of a series of posts revolving around mod support, the introduction and links to the other posts can be found here.

Our current game in development, Solitude, is a cooperative multiplayer action survival game. Since its a coop game we use a game server that is bundled with the client to allow players to host their own servers and it’s also used for the single player experience. From the very beginning we wanted to give players the maximum mod support we were able to so we decided both the game client and server would be moddable. As our game server is written in C++ that meant embedding and integrating Lua into C++. I’ll write about integrating Lua into Unity as a separate post.


A Faster Lua – LuaJIT

Lua is the scripting language we decided to integrate into our game’s scripting layer for code logic control. The aim is for the scripting layer to control all gameplay logic while the core, C++, layer will control generic non-gameplay game logic and time critical algorithms. To gain the speed increases discussed in the last post we decided to go with LuaJIT, which is a Just-In-Time compiler for Lua.

LuaJIT is distributed as source code so to gain a binary version you need to compile it against your compiler of choice. Our server is developed using the C++ compiler MinGW x64 and since we want it to be as cross platform as possible we use the POSIX threads version. What this means is that the threading library used is cross platform instead of using the default Windows threading library when on Windows.

LuaJIT can have some trouble compiling if you’re using the wrong variation of MinGW. For LuaJIT to compile correctly you need to use the SEH and not the SJLJ variation. SEH and SJLJ are two different types of exception handling systems and if you try using the SJLJ version it just won’t compile at all. After that’s compiled you need to link your C++ project against LuaJIT and run some examples to test everything is working. If you are already using core Lua then it’s a simple drop-in replacement.


Bringing Object-Orientation to Lua

Lua is a powerful, fast, lightweight, embeddable scripting language but Lua is not an object-oriented language.

The above is a pretty powerful statement, especially since today so many languages are object-oriented. Ideally we would like to use all the advantages of Lua but still have object-orientation. So… is that possible? Yes, by using Lua’s flexible table data structure and some clever libraries. To help us save time we use a library called classes.lua. It allows you to construct classes in Lua that can be passed around and used in a way that feels natural to anyone used to object-orientation.

For an example, at the top of your intended lua class file you’d add:

Door = classes.class();

Provide a constructor:

function Door:init() 
	-- code
end

and then when you want to create an object from the class you’d call:

local door = classes.class(Door);

and it’s as easy as that. You can then call methods on the object like you would in any object-oriented language but with the syntax of:

door:open();

Without classes.lua you wouldn’t be able to do this in Lua (unless you coded it yourself). By bringing in object-orientation it allows us to better bind our core and scripting layers together and make an easy to use and flexible modding framework. I’d highly recommend you look at classes.lua, or the many other OO libraries, for Lua.


Binding Lua and C++: The API

Once you have LuaJIT and object-orientation working in your project you need to consider how you want modders to interact with your game. Generally it’s a very good idea to create a level of abstraction so to make things easier for modders. Make C++ do the heavy lifting where possible and allow it to present the results to the scripting layer when requested or required.

When you want to start coding your API you quickly find yourself asking questions like “How on Earth do I get Lua to understand C++ objects? Can my Lua objects be sent back into C++ for processing?”. Welcome to the world of Lua / C++ binding.

Lua does not understand your C++ classes unless you code it to understand it. Binding, in this example, is the process of exposing the C++ classes to Lua. It allows Lua to understand your C++ code and there are two ways to bind C++ and Lua together.

Manual Binding

Manual binding means you write the entire binding yourself. There is a pretty infamous and painfully sharp post about why you should take this approach instead of automatic binding. You can read it here but to summarise they paint automatic binding in a bad light. I happen to disagree with the post but it does raise some valid points. At the end of the day, manual binding is harder and takes much more time to complete. If you’re a small team there will always be the cost vs. benefit argument. For us, manual bindings didn’t bring any real advantages.

Automatic Binding / Glue

Automatic binding / glue means the binding is automatically created for you. Most binding libraries simplify the process massively and provide various advantages depending on the library used. I won’t go into all the libraries as there are too many out there but each take a slightly different approach to binding. There will be a performance hit for using a library but a lot of libraries take performance very seriously and do their best to keep things as fast as possible.

For Solitude we used an automatic binding library called LuaBridge. After a lot of research and evaluation I found that this worked best for us and was the right balance of sensible syntax, functionality and performance. When using LuaBridge, you link it to your C++ project then register the classes you wish to expose to Lua. For example,

void ScriptAPI::registerEventManager(lua_State* state) {
	getGlobalNamespace(state)
			.beginNamespace("event")
				.beginClass<event::EventManager>("EventManager")
					.addFunction("registerEventHandler", &event::EventManager::lua_registerEventHandler)
					.addFunction("registerEvent", &event::EventManager::lua_registerEvent)
					.addFunction("triggerClientEvent", &event::EventManager::lua_triggerClientEvent)
					.addFunction("triggerEvent", &event::EventManager::lua_triggerEvent)
				.endClass()
			.endNamespace();
}

The above code registers the Solitude C++ EventManager so it’s accessible to Lua. You can pick and choose what methods you expose on the class so it’s flexible if you only want to expose select functionality to Lua. You specify the method names and how you’d like to access them from Lua. The method signature is automatically extrapolated by the library. This extrapolation can cause some issues with method overloading but there are workarounds for that. From Lua, you’d access the EventManager as follows:

-- Door was opened so trigger the door opened event
EventManager:triggerEvent("ON_DOOR_OPENED");

Even from this simple example you can already see how powerful and easy it is to bind C++ and Lua together with LuaBridge. Things can become even more powerful when you expose your custom objects and actually create them in Lua instead of C++, then feed them back into C++ for processing. That’ll be for a later blog post though.

After LuaJIT, classes.lua and LuaBridge are in your project you can slowly create your scripting API. Knowing what should be in the core layer and what should be in the scripting layer takes time as there is not always a clear boundary. Hopefully this helps create a clearer understanding of what it takes to embed Lua into C++. Thanks for reading. Feel free to get in contact with me on the comments, email or grab me on Twitter at @CWolf.


Links

Lua – Scripting language
LuaJIT – Just-In-Time version of Lua
classes.lua – Object-orientation library for Lua
LuaBridge – C++/Lua binding library
MinGW-w64 C++ Compiler – C++ compiler

The IOs of Game Netcode #4 – Blocking and Non-Blocking Sockets

This is part of a series of posts revolving around game netcode development, the introduction and links to the other posts can be found here.


In this post, we’re finally back onto some netcode stuff. We’re going to address the differences between blocking and non-blocking sockets. Both types are usually provided by the socket implementation that comes with your OS, or are provided as part of the standard library for that particular language. In addition, they may also be wrapped into a single interface, simply operating in different modes (blocking or non-blocking mode) or separate interfaces, one dedicated for each.


Blocking Sockets

This is your typical TCP socket and it’s what you will find most of the time when looking for tutorials and examples of netcode. In other documentation and articles, if it does not specifically say they are non-blocking sockets, then they will no doubt be referring to the blocking variety. This is because they are easier to work with.

Simply put, blocking sockets will block the current thread until the read or write operation has finished. With a read operation, it will block until the specified number of bytes have been read. With a write operation, it will block until the specified bytes have been successfully written.

However, it is not as straight-forward as this. Socket implementations have their own internal socket buffers. So, when performing read and write operations, the thread blocking occurs when it cannot read from or write to the internal socket buffer (as it is either full or empty depending on the operation). Most of the time a write operation will never block because there will be space in the internal output buffer (except if you’re sending larges amounts of data, such as transmitting file data). The socket implementation will automatically send any data in the internal output buffer and accumulate new data in the internal input buffer when it receives it. So, if the network card has already received data into its internal input buffer that your game netcode is expecting, then the subsequent read operation will not block, it will read that data straight from the internal input buffer instantly without blocking.

This is why we’ve been dealing with threads up until this point. In order to make use of blocking sockets, you’ll need to run at least one thread per socket. This isn’t necessarily an issue on a client because you’ll only ever have one or two open sockets to the server at a time. However, on a server that is required to handle many concurrent clients, the thread overhead can begin to build up.

Of course, as with everything in the world of software development, there are always exceptions. For instance, you can check the number of available bytes to ensure everything required is in the input buffer before invoking a read operation and therefore never blocking. You can do similar checks for the write operations. This works well for simple netcode applications and will allow you to run the netcode for all your clients in a single thread, or even in the main thread (although this is viewed as extremely bad practice), without any major issues. However, with more complex netcode, especially variable sized data packets, it quickly becomes increasingly difficult. If you find yourself doing this to handle multiple clients in a single thread, you should really stop because you are actually reinventing the wheel. What you really should be using here are non-blocking sockets.


Non-Blocking Sockets

This type of socket is very similar to blocking sockets, with one difference. All operations performed on a non-blocking socket are expected to return immediately and thus will not block the current thread. This changes absolutely everything in regards to working with them. You can’t just read from a non-blocking socket and then deserialise the data as no data may be returned (and it will not block until there is some). Instead you need create your own buffer and read data into it, then when you have everything you need, deserialise the buffer.

And yes, I know you should be reading blocking sockets into your own buffers as well if you want to be able to deserialise any kind of complex data packets, but there are other complexities that need to be handled. When writing, if the socket’s internal write buffer is full (due to lots of data or poor bandwidth), the write operation will block. Which allows you to throw everything you have at it and it’ll block until it eventually goes through. This is not the case with a non-blocking socket. You have to monitor the number of bytes written and remove those bytes from your buffer yourself before the next write.

Why would you opt for a socket type which is clearly more difficult to handle? Well, as with most hard ways there are benefits. Knowing that no matter what you do the socket won’t block the current thread has its advantages. Checks can be removed, assumptions can be made. Once you design your netcode to handle instant returns of zero data, you’ll realise that you can run all sockets on a single thread. This is what I was referring to at the end of the section on blocking sockets and it is excellent when it comes to writing game servers. However, it gets better. You can make use of selectors.


Selectors

These handy utility classes allow you to query all objects registered with it in a single operation. I’m not entirely sure if there are different types, but the selectors I’ve worked with in Java and C++ are specifically designed for use with sockets and IO streams.

Once registered, you can query the selector for all streams which are ready for IO. If none are, then the select operation will block until at least one stream is ready, otherwise it will instantly return. After the select is called, you can then retrieve the list of ready streams. In C++ you can select the read ready and write ready streams individually, but in Java you will need to check whether the ready state refers reading, writing, or both. Either way, you can get a list of streams and the state they are in, which allows you to process all the reads and writes in one go without blocking. Once complete, you just loop back round and start at the select again.

Now, I’ve done some light benchmarking to see which performs better, one socket per thread or all sockets on a single thread using a selector. All I can tell you is that using a selector is blazingly fast and, with the other benefits of lower thread overhead and being much easier to manage on a single thread, I very much prefer this approach these days. It makes up the core of the netcode in our Solitude game server and I have measured it before a couple times looking for bottlenecks (which existed elsewhere) and it doesn’t even register a microsecond with multiple clients connected.


Conclusion

Non-blocking sockets are definitely better than their blocking brethren, but they are a little trickier to set up and use. However, once you have your net framework done, you don’t really ever have to worry about it again. Of course, the benefits you get only really apply to server applications. We still use a blocking socket on its own thread in the client because there is absolutely no point in changing it now. There will be zero benefit.


Anyway, that pretty much wraps up this post. As always, if you want to chat about any of the topics or issues I’ve raised you can either comment below, catch me on IRC (on the navigation bar click Community→Chat) or send a tweet to @Jargon64.

Thanks for reading! 🙂

Interfacing with UI #3 – uGUI – Beta First Impressions

This is part of a series of posts revolving around user interface design and development, the introduction and links to the other posts can be found here.

With this post I want to talk about my first impressions when using Unity 4.6 Beta 18, specifically relating to uGUI. Everyone should realise that uGUI is still in beta and is improving with every beta release. I’m sure a lot of issues will be fixed but my post will be a snapshot of how things are now and my thoughts. As a side note to tie up my previous posts, with the death of Daikon Forge and no longer any hope of DF-GUI v2 we’re moving full steam ahead with uGUI. With that, let’s get to it.

I’ve been using uGUI, Unity’s long awaited new user interface framework, for the past week. I’ve been developing Techyard’s (Solitude’s mod / dev tool) new user interface with it. Generally it’s not been a too painful experience but I’m making slower progress than I had hoped. Part of this is the usual learning curve of a new middleware but also due to the current state of uGUI.

uGUI is excellent in that it’s free and integrated into Unity. What I am most happy with is that Unity has decided to open source uGUI on the official release of Unity 4.6. This is amazing news as there is already an active community forming around uGUI and, with community involvement, I fully expect some excellent extensions and modifications to appear. Even during the past week people have been sharing some excellent scripts to supplement the framework.

The system is relatively easy to use from the Editor and makes use of a visual anchor system that seems to work pretty well. Exact position can be a bit of a pain though as dragging the anchors never gives exact positions – it’s all very ‘close enough’, which isn’t nice. Corrections are always needed in the components if you want exact numbers. Since Solitude will create most of its UI programmatically I think the anchor system might be more of a foe than a friend, but I haven’t done enough 100% programmatically to say for sure yet. Scaling seems to work fine, even if it’s basic support right now, but aspect ratio support could do with some extra work. Luckily, Unity have mentioned scaling is a focus soon and, hopefully, this will include better aspect ratio support. While images can be selected to maintain their aspect ratio I think this functionality would be very useful at a higher level.

Currently uGUI provides a few basic UI components but little to none of the more complex ones. Most of my time has been recreating the more complex UI components in a reusable way and converting the previous Daikon Forge UI to uGUI. I’m been making decent progress on this so the Techard UI work should speed up as times goes on.

Like most Unity-based UI frameworks, small things exist that annoy. The main thing I get tired of is that you can’t increase the size of a UI panel without scaling the content inside it too. Imagine when you create a panel then realise you want to add more content into it. Resizing the panel scales the content inside, even when the anchors are not set to scale. This use-case can be a pain. There may be a trick to unhooking the anchors before you do this but I’ve seen this exact behaviour with all UI frameworks and it’s a pain. The only ‘fix’ is to remove the content from the panel, resize the panel and then add the content back in. Hopefully Unity, or the community, come up with a better solution (or I find my mistake). I’ll probably look into this issue in more depth soon. Things aren’t bad, just fiddly.

Performance seems good for now. uGUI has better CPU performance than Daikon Forge but the draw calls can be a bit higher depending on how things have been set up previously. Sometimes a single draw call on NGUI / Daikon Forge can come in at four draw calls. I have a feeling things get better for uGUI with more complex UIs though so I’m not worried about this at all. Render order is taken from Unity hierarchy order so this change will be new for a lot of people. I’m pretty sure I’ve seen what is a rendering order bug but need to submit that to be sure of it.

All in all, it’s great to see the shift in Unity’s closed communication attitude of the past few years. The past six months have seen Unity allowing their team to talk much more openly about what is going on. This is very evident in the Unity 4.6 Beta forum where Unity are taking a lot of time to help developers having issues with uGUI. This is a good sign for the future.

I’ve had my fair number of problems with uGUI but it’s only the second week of the beta. If I’m completely honest I would have hoped that uGUI would be in a better state considering how long it has taken them to make. I guess recoding it three times over does tend to reduce a feature set. I do have to keep reminding myself it’s still a beta and not to be too harsh though. A lot of these problems will be sorted out so we’ll be sticking with uGUI for the immediate future. It’s probably worth using uGUI if you’re starting a new project but I wouldn’t recommend ripping out UI in an existing project just yet. It’s great to see Unity take positive steps on the UI and I look forward to the source being released.

Tech Demo Aftermath

It’s been a month since our last post and we’ve been pretty busy so we haven’t had time to put together another one of our blog series’ posts. However, we will update you on what we’ve been up to recently.

As mentioned in the previous blog post, the Wales Games Development Show went really well for us, leaving us on a bit of a high and raring to jump straight back into game dev. Still, we decided to take a step back and analyse why the tech demo went down so well. We know what we have planned for Solitude, but the tech demo was a very small slice and a very specific scenario that could possibly arise within the game, and because it was so successful we wanted to make sure what it had was not lost as we progressed.

After we examined the tech demo and determined the core gameplay mechanics that made it so much fun to play, we proceeded to refactor and clean up the entire codebase. The entire tech demo was developed in just over 2 months from beginning to end, with the last 5 weeks being some pretty intense crunch. The result, there was a lot of messy code, quick fixes and hard-coded systems to get the tech demo ready in time. So, naturally we had go back through and sort it all out. At the time of the tech demo, the server-side mod scripting system was already in and the scenario was written in it. However, the client-side mod scripting was not, so all the client-side tech demo scenario stuff had to be hard-coded. Over the past month Rich has implemented the client-side mod scripting layer and rewritten the entire tech demo to use it as a test. As of now, none of the tech demo game logic is hard-coded and it completely resides as scripts that get loaded at runtime. However, Unity does not natively support runtime model loading, so in order for our modding system to be complete, Rich is having to implement his own runtime model loader (I’m sure Rich will write up a whole post on his as it nears completion).

We also brought in an intern (Steve Cox) to work with us for a couple months and got him doing some of our outstanding tasks and has generally been a massive help. He’s already ported the dedicated C++ written server from Windows to Linux and replaced our build process with an ant build script. This allowed us to hook it up to Jenkins to automate the build process. He’s also created some targets in the ant build script for cross-compiling so we can automate Windows builds from our Linux dev server. All stuff that was on the to-do list and incredibly important. Kind of nice having an extra pair of hands around. We’ve currently got him working on some of the procedural generation code that will eventually feature in Solitude and that’s looking good so far, but there’s still lots more to do on it. We put together a short video to show where we are on that front (height deformation works but currently turned off).

James has been busy working on Solitude’s mod synchronisation system between the server and the client. The idea is that when a server is launched, it scans over its own installed mods (which includes the client-side assets as well) and stores that information in a registry. When players join a game’s lobby (before the game has started), the host is able to select which mods they want enabled for that particular play-through. Once decided, they hit launch and the server checks if the clients have those mods installed and that the files match. If not then the server begins transferring the mod files to the clients that need them while they are still in the lobby (so they are still able to chat). Once all mod files are transferred, the clients load them and then receives the state of the environment from the server before launching into the game. This means that any player will be able to join any server regardless of whether they have the mod files installed or not as they’ll be install on-demand.

That pretty much summarises what we’ve been up to lately. Hopefully, we’ll be able to get out a blog series’ post in a couple weeks.

Thanks for reading!

Mod Support #1 – Scripting Languages

This is part of a series of posts revolving around mod support, the introduction and links to the other posts can be found here.

For our current game, we’ve decided to provide as much mod support as possible. One large part that will contribute to this is providing a scripting language both on the server and client.


Scripting Language

So… what exactly is a scripting language? A scripting language is a programming language used to control another application. In the case of games, and depending on how they are implemented, they can be embedded and used to control the game logic layer. There are advantages and disadvantages of embedding a scripting language in your game, these are:


Good: Mod Support

By pushing as much as possible of the game logic into the scripting layer you allow for a mod community to grow around your game. Over the last few years mod support in games has been very lacking and if you provide mod support you’ll be greatly increasing your game’s shelf life and differentiate yourself from the crowd. Modders can become a very loyal and technically helpful addition to your community. Also, who wouldn’t like to see what other people can do with the world you’ve provided them? You make a game because you love the idea and world (hopefully!). Seeing what others can craft with the tools you give them is a great feeling and can even rekindle your original feelings if you’ve unluckily burnt yourself out.

Good: Fast Development Iterations

When developing, if you can do something faster without sacrificing quality – you’ll want to do that. By pushing the game logic out to the scripting layer you’ll be able to reload the scripts without restarting, or recompiling, the game. This is especially useful for developing artificial intelligence and if you’re working with C++. Recompiling your project for every minor edit is exhausting and, after the thousandth time, can send a developer to the edge of insanity and then past the gates of Oblivion.

Bad: Initial Integration

The initial research, selection, embedding and binding of the scripting language to your game core can take a while and is not the easiest thing to do. It may seem like too much effort for developers who are on a very tight schedule and are not experienced enough to get through the process.

Bad: Slower Processing

Any embedded scripting language will almost certainly run slower than the core language you’re running it from. This can eventually have an effect on the end game system requirements but there are steps that can be taken to mitigate the worst cases. Any heavy duty, performance critical code should be run in the core language and then this can be provided to the scripting language as an API call. By doing this, you’re correctly breaking the core logic and the game logic apart and keeping them in their respective places too.

Bad: Exposure of Source

Whilst some scripting languages allow you to pre-compile your scripts to shield your code from prying eyes – you may actually want to share the uncompiled scripts with your community and modders. Your scripts can be the best teaching tool for how to use your scripting API and provide a great start to mods. This matter really depends on how you view your game logic source code and if you’re willing to provide it for the greater good of your game and the modding community, or not.

Bad: Security

If you expose a way for the community to mod your game you will always get someone who will try and do malicious things with it. You will need to sandbox your scripting language runtime and / or whitelist libraries to prevent this. It’s very hard to maintain a complete sandbox but in the end you have to try your best. No one likes a rogue mod deleting save files… or worse.


Prerequisites

After deciding that we want to use a scripting language for the above reasons, and feel the above disadvantages aren’t too bad, we need to decide on what language to use. There are lots of choices out there for game scripting languages. For a good game scripting language a few prerequisites need to be met.


Performance

Since we aim to provide extensive mod support we are developing as much of the game logic in the scripting layer whilst keeping any processing intensive code and generic client / server logic in the core layer. Due to this the scripting layer needs to be as fast as possible. This is a very important point as stacked inefficiencies will eventually bite you.

Ease of Use

We want modders to be able to get up and running creating mods as quickly as possible. For this we need a scripting language that won’t take new users too long to get into so the lowest possible barrier to entry is required. My early days of development was modding newly released Fallout 1 and 2 so I’d like to give people an easier ride than what I had to do with installing compilers and editing huge files of identifiers.

Security

Since we plan for mods to be client and server side then we need to ensure nothing terribly bad can happen when running mods. Crashing games from bad mods can’t usually be avoided, however, preventing unrestricted access to the end user’s computer is very important. Either a sandbox or whitelisting of functionality is a must here.

Power / Extensibility

Game logic can become very complex so we want to use a language that is either powerful enough to do what we want or can be extended to do what we want. There is no reason to handicap ourselves.

Easy to Embed

At the end of the day, Rogue Vector is a two person company and adding mod support is a huge undertaking that can equally provide huge benefits. We need a language that will be fast for us to embed without spending months trying to integrate and bind it.


Language Choice

With the prereqs all agreed on, we need to select which language will be a good fit for us. There are too many scripting languages for me to go into them all, however, they fall into two main categories: dynamically or statically typed. Here are a few languages and the considerations to take into account.


Statically Typed

As a rough generalisation, statically typed languages are high level languages that, at compile time, execute extensive checks to ensure type safety and are bound to a data type and an object (or null). Compiler optimisations are also applied in statically typed languages.

mono

Mono is a .NET framework runtime that supports embedding and running of many other languages, even those not from the .NET family such as Java. While Mono is rather large to include in your game it’s surprisingly nimble when it comes to the benchmarks and code execution. In many of the benchmarks it comes out as the fastest scripting system of them all. The main issue is that to use Mono embedded in a commercial product you have to pay a licence fee. This was a deal breaker for us so we stopped investigating it but it has been used amazingly well by Unity and Second Life as their scripting base.

angelscript

AngelScript is a mature language that is very close to C++ in syntax. It hides and handles pointers and memory automatically so that reduces the complexity, however, for a scripting language to remain so similar to C++ may raise the barrier to entry for modders. On the other side, it allows for developers to swap between the scripting and core language without any worries on having to mentally swap development modes. If you want to have C++ style scripting and your core game is C++ then AngelScript may be your winner here. It has a very clean integration and so that reduces the need for a binding library, which is a big plus. It’s used successfully in games such as SOMA, Amnesia and Overgrowth.

Thanks to Ian Thomas (@wildwinter) from Frictional Games and GameDevWales for feedback on AngelScript.


Dynamically Typed

Again as a rough generalisation, dynamically typed languages are high level languages that, at runtime, execute many common programming behaviors that statically typed languages perform during compilation. They are not bound to a data type but only to the object (or null).

lua

Lua is generally seen as the games industry scripting language of choice. It’s very lightweight, fast and very portable. Lua becomes even faster when using the JIT compiler called LuaJIT. While it’s only a procedural language it does have a very flexible data structure that allow for object oriented programming techniques to be used. Extension libraries can bring that support even closer to full object orientation. The language itself has a few things to get used to, such as indexes starting at 1 and not 0 and missing expected keywords like ‘continue’, but it’s not too bad to get used to. All in all, it’s easy to see why Lua is used frequently for embedded game scripting and has been used in games such as World of Warcraft, Freelancer, Garry’s Mod and Natural Selection 2.

python

Python is another popular procedural language similar to Lua. It’s a lot heavier due to it including all the nuts and bolts that Lua does not. It also runs slower than Lua so this is something to keep in mind. I have an issue with the white space nature of Python but that’s more a personal dislike more than anything else. In the end, Python’s focus is wider than Lua for better or worse. Python has been successfully used for game scripting, like in Civilisation 4 and Battlefield 2, so that speaks for itself.

v8

Google’s V8 Javascript-based scripting language seems to be a faster choice than core Lua, however, it’s slower than LuaJIT according to the sources I’ve found. I haven’t been able to confirm this with hard benchmarks as I don’t have time so I’d just say it’s pretty fast. Binding support seems to be lacking and it’s an uphill struggle to get it embedded and working the way you want, especially if you want to pass complex objects between the core language and V8. I couldn’t find any games that currently use V8 as their scripting language but, on the brightside, a lot of people know Javascript syntax.


Our Conclusion

We decided to back Lua (LuaJIT) for our scripting language of choice. The main reasons are already mentioned above but also we needed a scripting language that is consistent between the server and client. While Unity has no native scripting support, there are assets that help integrate LuaJIT in nicely. Other scripting languages would be harder to integrate into our game client. At the end of the day most of the scripting languages highlighted have been used very successfully so personal preference is also a key deciding factor.

For a more indepth look at some of these languages and a set of benchmarks see the blog post at upvoid.com. A wider set of benchmarks are found here and here. My next post will go into more details of LuaJIT embedding and binding into a C/C++ game core.

Thanks for reading. Feel free to get in contact with me on the comments, email or grab me on Twitter at @CWolf.

Mod Support #0 – Introduction

Mod support is a loved, much asked for and difficult to implement side of game development. It can range from small configuration file changes to full blown total conversions. In the more extensible form it takes enough experience with games to extract game logic from core logic, embed scripting languages, load models and animations at runtime and merge it all together as seamlessly as possible.

Coming from a modding background before entering software and games development it’s an area very close to my heart. I feel it’s an amazing tool to help increase your game’s longevity and, more importantly, allow for a community to form around your game. In the best situations this community can create amazing additions or changes to your game that can add new life to a game that, even as the developer of, may rekindle your interests after you’ve long exhausted yourself.

As we’ll be adding mod support to our current game we’ll write about what we use and how we go about using it. As there tends to be little information about the more complex side of things we’ll try to expose these under discussed areas to help more developers planning the same thing.

If anyone wants to get in contact with me feel free to reach me at richard@roguevector.com or my Twitter at @CWolf.

Contents

The IOs of Game Netcode #3 – Synchronisation and Locks

This is part of a series of posts revolving around game netcode development, the introduction and links to the other posts can be found here.


We’ve already established you need to run your netcode framework on a different thread to your main game’s update/render loop, something which all netcode developers will agree is a requirement for writing good netcode. This means you’re already in danger of the threading and concurrency issues mentioned in the last post. So how do you ensure that you don’t run into these issues? Well, you have a few weapons in your arsenal to tackle the problem. The first one I’m going to discuss is locks.


Locks

Think of locks as your most basic weaponry against threading issues. The pistol with infinite ammo you switch back to after your power-up wears off. Locking is a synchronisation mechanism that ensures that only one thread can execute a piece of code at any given time. It does by forcing other threads to wait until the currently active thread is finished with the locked code.

Locks are such a common mechanism that I’m pretty sure all modern languages that support multi-threading also support locking. It’d be pretty disastrous if they didn’t. The main differences are the types of locks, the terminology and how they’re used. You usually have a couple of types available to you, such as object-level locks and method-level locks. Object-level locks are the bread and butter here and more complex locking mechanisms can be built upon them. In C# an object-level lock looks like this:

lock (this) {
	// Your synchronised code
}

In Java you achieve object-level locks using synchronized blocks, which are essentially the same thing:

synchronized (this) {
	// Your synchronised code
}

Unfortunately, in C++ you do not have a simple statement for object-level locking (although I’m sure you can create a template to do it). Instead, you need to instantiate a mutex (mutually exclusive) object (part of the C++ standard library) and perform the lock operation on that.

std::mutex mtx; // Declared in the class constructor

mtx.lock();
// Your synchronised code
mtx.unlock();

These code snippets will all do the same thing when multiple threads hit it at the same time. The first thread to request the lock will get it and be allowed to proceed to execute the code within the lock. All other threads will request the lock, but will be forced to wait (block) until the thread with the lock leaves the synchronised code, after which another thread will receive rights to the lock and proceed.

There are also method-level locks, which work similarly to the object-level locks, except work at the method level, synchronising everything inside a particular method. In C# this is achieved with the following:

[MethodImpl(MethodImplOptions.Synchronized)]
public void SynchronisedMethod() {
	// Your synchronised code
}

In Java, you use the same synchronized keyword as in object-level locking:

public synchronized void synchronisedMethod() {
	// Your synchronised code
}

C++ does not have a mechanism for method-level locking, but this can be easily achieved with a simple object-level lock. The method-level locking is just a convenience mechanism for object-level locking everything in a method.

Now, method-level locking and the examples I’ve shown for object-level locking have a pretty serious issue to take into consideration. A thread can achieve a lock on a method or an object while another thread has the same lock on a different object of the same class. This is because these types of locks are handled at the object level (locking against it’s own instance or a member object). For the most part this is exactly what is required, but sometimes there are situations in which you need to synchronise all instances of a particular class. This is called class-level locking and can be achieved in a couple of ways. You can perform an object-lock on a static object shared by all instances of a specific class, or you can do method-level locking on static methods.

Of course, with most coding concepts, there is a down-side to very up. With locking mechanisms, that is deadlocks


Deadlocks

A deadlock is when a thread is indefinitely blocked by a lock and they usually occur when multiple threads are executing code that results in nested locks on. For example, let’s take the classic bank transfer scenario.

public class Account {

	private double balance;

	public Account(double balance) {
		this.balance = balance;
	}

	public void withdraw(double amount) {
		balance -= amount;
	}

	public void deposit(double amount) {
		balance += amount;
	}

}

public class Bank {

	public void transfer(Account from, Account to, double amount) {
		synchronized (from) {
			synchronized (to) {
				from.withdraw(amount);
				to.deposit(to);
			}
		}
	}

}

Both accounts are synchronized so that exclusive access is obtained and the program is assured that it can perform all operations required of the transfer without blocking. The deadlock arises when a Bank executes two opposing transfers between the same two accounts at the same time (separate threads).

final Account account1 = new Account(1000);
final Account account2 = new Account(1000);
final Bank bank = new Bank();

new Thread(new Runnable() {
	public void run() {
		bank.transfer(account1, account2, 500);
	}
}).start();

new Thread(new Runnable() {
	public void run() {
		bank.transfer(account2, account1, 500);
	}
}).start();

The result can vary depending on execution order, but if both threads manage to obtain their first lock, then a deadlock will occur. This is because both threads cannot obtain their second lock until the other thread releases it, resulting in both thread blocking indefinitely.

The primary reason behind deadlocks is bad software design. Deadlocks can easily be avoided if the developer takes a step back and designs the inter-thread communication first. If the program/system makes use of multiple threads, then a deadlock scenario should be at the forefront of the developer’s mind. I’ve seen a number of poorly written programs where the deadlock scenario isn’t even considered and, for the most part, the program runs fine, but occasionally a deadlock will occur. This is because the developer will just throw in a lock here or there to ensure they don’t run into concurrent modification exceptions and suddenly have methods with locks calling other methods with locks, resulting a nested deadlock. Of course, the way they solve this is to ensure the proper execution order by adding more locks, which as you can guess, just makes things worse.

In my experience, the best implementation of multi-threaded operation consists of very few locks, but in the right places. DESIGN YOUR MULTITHREADING FIRST! 🙂


Thread-safe and Concurrent Data Structures

So now you should understand how to synchronise your multithreaded code, while avoiding potential deadlocks. It will help you avoid the concurrency issues when writing good threaded netcode. Now, I’m going to briefly touch on a set of special data structures that are designed to further help you avoid concurrency issues and deadlocks.

Thread-safe and concurrent data structures are a set of data structures that follow a certain set of rules to ensure that race conditions do not happen. This is done through a variety of different methods, such as locking and atomic operations.

They take care of all of the concurrency issues without any of the potential deadlocks, making your life a lot easier. Java, C# and C++ all have a decent set of thread-safe data structures in their standard libraries, too many to go through here, but it’s definitely worth searching their respective documentations and read up on the specifics.

One thing you need to keep in mind though, even though the add and remove operations are thread-safe, any iterators or enumerations generated from these data structures may not be. Meaning, if you loop over all the elements in a thread-safe data structure, the resulting collection may not be thread-safe. So if another thread adds or removes an element to the data structure while the loop is being processed, you’ll end up with concurrent modification and a race condition causing unpredictable behaviour. Fortunately, these thread-safe data structures usually offer up some kind of fail-fast iterator or enumerator which will throw a concurrent modification exception when it detects that the underlying structure has been modified after it has been created, which can then be handled properly by the developer.

You can usually avoid the concurrent modification exception by using the correct concurrent data structure for the job and in the right place. I like to use a concurrent queue for inter-thread communication as it allows me to iterate through the queue in a thread-safe way using peek and pop operations (no need for iterators or enumerators), which I will show an example of in a later post.


This pretty much wraps up this post. It’s a bit longer than the previous ones but I wanted to finish with the multithreading so that I can actually get into some nitty-gritty netcode stuff next post 🙂 Hopefully you can take something away from this that will aid you in your game development, and as always, if you want to chat or pick my brains about anything you can either comment below, catch me on IRC (click Chat above) or fire me a tweet to @Jargon64.

Thanks for reading! 🙂

Interfacing with UI #2 – Scalability & Aspect Ratios

This is part of a series of posts revolving around user interface design and development, the introduction and links to the other posts can be found here.

The first article in this series discussed the different libraries that exist and the pros and cons of both. In this article I’ll explain the choice of UI library we selected for our current game in development and how we tackled the scalability and aspect ratios problem of UI design and implementation.


Our Library Choice

Daikon Forge GUI

Based off the information discussed in the last article, we decided to go with Daikon Forge UI framework (DF-GUI) for our game. For all the good and bad, DF-GUI is a raster based library for Unity. Along with all the previously discussed advantages we felt the source code access was crucial so we could maintain ownership over our codebase. While we would have been able to obtain the source code to some of the vector based libraries the cost was prohibitively expensive. This limits us from some of the nicer vector libraries but as long as this is planned for, it isn’t a major problem.

It’s important to note that DF-GUI is being redesigned from the ground up for version 2.x. If you intend to buy DF-GUI you will want to either wait until 2.x is released, which that is risky unless you’re not on a schedule, or use another library.

The rest of this article will discuss two approaches to solving scaling and aspect ratio issues and will go into our reasons for selecting the one we did. I’ll try to keep things as generic as possible.


Why not use NGUI?

Since this question may pop into a few heads I’ll tackle it straight away. NGUI is a widely used UI library for Unity. It was so widely used that Unity even hired the lead / sole developer to help them create uGUI and NGUI was used as the starting code base (even though apparently it’s changed a lot since then).

Not to go too deeply into this point I feel we should touch on it at least a little. We used NGUI 2.x in a previous project spanning seven months. While it’s a powerful UI library we found we were fighting with it every step of the way. Over the past few months NGUI has been undergoing major redesigns and features for the 3.x branch. We tried an early version of the 3.x branch out and, while the changes were improvements, we felt we were going down the same road as before. Most of the examples are completely out of date and, whilst the NGUI forums are very active, the developer support is usually limited to a single line reply. Needless to say we felt it wasn’t for us and so we decided to look for alternatives and found DF-GUI. In the end, some people are very happy with NGUI so I’d recommend you do your research into it either way.


Why not wait for uGUI?

With Unity’s very own uGUI arriving this summer in Unity 4.6 why not wait for it? One rule of thumb is to never wait for technologies to arrive to develop on. The technology usually will not arrive when it’s meant to and when it does arrive it’ll be, or do, less than you anticipated.


The Problem – Scale and Aspect Ratio

Since we are using a raster based library we accept the problems previously discussed, primarily ensuring scaling and aspect ratios don’t destroy a carefully crafted UI. So the main problem breaks down into two problems.


Pixel Perfect Scaling & Blurring

Game UIs need to scale. Without scaling you’ll end up playing games that seem to have tiny user interfaces since they were designed for smaller resolutions than you’re currently playing at. The problem when scaling a raster based UI system is that you tend to get blurry images. This is a very similar effect to when you run a game at non-native resolution and the game text and UI is slightly blurry. The term I’m using, pixel perfect scaling, is a bit of a misnomer. An image of size 200×200 pixels will only be pixel perfect if it stays at 200×200 pixel in screen space. A nine-sliced sprite, however, can be a little more flexible when it comes to being pixel perfect. This can scale and remain sharp.

Pixel Perfect Example


Aspect Ratios & Stretching

Games UIs need to accommodate the main aspect ratios that exist at the time of creation and the near future. For us at the moment we’re seeing 16:9, 16:10, 4:3 and 5:4 still being used. The difference in horizontal screen space between 16:9 and 4:3 is fairly sizable and this difference can cause some big issues with UI layouts, especially if the UI should maintain a specific user experience.


Aspect Ratio Flexible Layouts

So to fix these two problems I did a lot of research and came to the conclusion that it’s actually hard to find information on this. There seems to be two approaches, which are to ensure the entire UI can scale and stretch or adopt a safe zone aspect ratio to allow for non-stretching (but this could be extended to support stretching too).


Stretchable UI

The focus of this approach is to develop the UI so that it stretches to accommodate the different aspect ratios sensibly. The layout is entirely anchor based and would be linked to screen resolution and specific UI elements. The top level UI elements, usually panels, would be anchored to other UI panels and screen edges so when the aspect ratio changes the UI would grow and shrink accordingly. If set up well, changing the size would fill up the blank space that would otherwise appear when changing from a smaller (4:3) to larger aspect ratio (16:9).

Here we hit an important consideration to take into account. Depending on the UI design, the children of those top level panels may not be intended to be stretched. Plain sprites, as opposed to nine-sliced sprites, look bad when stretched width wise only. Think of an image for an icon for instance. On the other hand, any child panels would usually be fine to stretch as these tend to be nine-sliced sprites, but again the children of these panels may not stretch well. A mixture of fixed aspect ratio and stretch support is needed.

For us, DF-GUI’s 1.x anchor system isn’t flexible enough to support this approach very well in my opinion. Trying to construct a stretchable UI lead to a lot of frustrating days trying to ensure the aspect ratios would stretch but also maintain the overall user experience. The new NGUI 3.x anchor system would help a lot in this situation as it’s more flexible but at the time of testing NGUI 3.x there were still some issues that contributed to our choice to go with DF-GUI.

In the end, from our experience, this approach requires more development effort and testing to get right than the safe zone approach below. Even then, a lot of work needs to go into ensuring the UI is well developed for each aspect ratio so there are no large empty spaces within UI panels. This would happen when stretching a UI but not having enough content to actually fill the UI with. In this case minimum and maximum sizes would help but these would have to be computed at runtime as min / max sizes are limiting when factoring in scaling and resolution sizes.


Safe Zone UI

The focus of this approach is to develop the UI for the smallest aspect ratio but taking into account the highest resolution. Anchors are used to edge fit UI.

To help explain the logic, below is an example of the UI running at 1280×720 resolution. The implementation consists of two UI containers. The first is always set to maintain the core 4:3 aspect ratio and is coloured green. The second is set to expand to the full resolution of the game and is coloured blue.

Aspect Ratios

To allow for the maximum use of a game resolution that is not 4:3, the core UI (green) is scaled to the maximum possible resolution whilst still maintaining the 4:3 aspect ratio (this is why in the example the UI core is 960×720). The blue UI container is always at the full resolution of the game.

To use this layout the rules are:

  • All elements must fit in the core UI container when running in 4:3 aspect ratio.
  • All elements must be created within the core UI container. This maintains a consistent scale and prevents unwanted UI stretching.
  • Any elements that need to be on the edge or corners of the screen must use anchors. Anchors will position the element correctly regardless of aspect ratio by locating the corners / edges of the blue container. Even though anchored elements may be outside the core UI container, they will still be a child of it. This maintains scale and prevents stretching.


So what about if you want to stretch some UI elements in this layout? You would still be able to with a UI library that supported anchors or you developed your own. In our case, we will probably develop our own unless DF-GUI 2.x introduces a more extended anchor system.


Scaling – Dynamic Fonts

To maintain sharp fonts in the game use of dynamic fonts are a must. Traditional fonts are bitmap based and scale badly causing blurring. You either have lots of font bitmaps of different sizes, which is needless and takes up more space, or you use dynamic fonts. With dynamic fonts, Unity uses the FreeType font rendering engine to create the font texture at runtime. This helps a lot but a dynamic font set to size 12 will still be small when shown on resolutions larger than the design time resolution. The last step to correctly scale the font is having the dynamic font size actually set as:

[the design time font size] X [scale index]

This scale index would be calculated by the design time resolution compared to the current runtime resolution.


Scaling – Sprite Atlases

Since we are using a raster based UI system there will be times when a image will not scale well due to it being too small or too large. In this case we will need to use different sprite atlases and swap them in depending on the current resolution. This isn’t a great solution as it involves a whole new set of images at different resolutions but if the original sprite atlases is of high enough resolution this may not be an issue for some games. Scaling down a high resolution image is always prefered than trying to scale up a low resolution one.


Closing

The two approaches I’ve outlined along with the surrounding techniques are almost certainly not the only approaches to scaling and aspect ratios but I found very little information on this area. These are the approaches I discovered and developed upon. Hopefully this helps some of you out there. If you have similar experiences, or have different approaches I’d love to hear your thoughts. Comment, email or grab me on Twitter at @CWolf.

Thanks for reading.

Interfacing with UI #1 – Structure and Libraries

This is part of a series of posts revolving around user interface design and development, the introduction and links to the other posts can be found here.

During the development of our current game I’ve been tackling the user interface. This post outlines some issues involved with creating a pixel perfect scalable user interface that also handles the different aspect ratios whilst maintaining a consistent look and feel. (A bit of a mouthful, right?). Some of the article will be specific to Unity as this is our current development engine but, hopefully, even if you’re not using Unity you’ll be able to take something useful away.


Libraries vs. Bespoke

The first decision that will affect your ability to achieve the best possible UI will be a typical development question.

Shall I use a library or build my own?


Each development team approach this question differently but there are some key points to consider. There is the usual trade off between how big your budget is, how many developers are involved on the project and how long the project schedule is. Even if you can afford to dedicate a developer for a few months to develop a custom UI system from scratch, is that really the best use of their time and your money? I’d say it usually isn’t unless you’re planning a lot of revolutionary features that none of the existing libraries provide. This usually isn’t the case.

Now I’ll play devil’s advocate. If you decide to go with a library, what about the features, maintenance, extendibility and future roadmap? Is there much use using a library that you can’t extend or fix yourself? What if the updates are released further and further apart? Those aren’t ideal situations so each of these points are worth some consideration. Any one of them might have a major impact on your game.

For us, a two person team, building our own UI system just isn’t viable. It would take a single developer many months of full time development to achieve the functionality that is available in existing libraries. In our case we’re happy with functionality provided by some UI libraries, however, we made sure that the source code was available in case we ever wanted to branch development.


Vector vs. Raster (Bitmap)

When selecting or building a UI system a choice will need to be made on what image format will be used. Will the system support vector, raster or both? For this article I’ll assume the difference between vector and raster is known but if not there is a summary here.

There seems to be some debate on whether to use of a vector or raster based UI system. When digging deeper into developer’s preferences two Twitter conversations lead to the following comments.

You mean something like Scaleform? Too expensive. NGUI (on which uGUI is based) does a perfect job, if you do it right.

and

Smart UI dev tries to be resolution independent, supports various aspect ratios. With vector based UI, it’s not a problem.


The split in opinion comes from the fact that there isn’t a clear right or wrong choice and there very rarely is in software development. Both vector and raster based UI systems have their advantages and disadvantages independent of the file format itself. Straying into Unity specific libraries I’ll try to highlight the differences between the two systems.


Raster System (Daikon Forge, NGUI, uGUI)

The raster based libraries that exist for Unity are almost entirely drag and drop or wizard based. This makes for a very designer friendly approach, especially if the designer has limited to no programming experience. Some programmers may become frustrated with such approaches though.

Good: Better effects & depth

Raster art tends to have a much wider range of effects that can be created and applied to them compared to vector art. Very often original files that start out as vectors will eventually be rasterised so effects and textures can be applied to them to give them more depth and smooth blends in colour.

Good: Source code provided

Most, if not all, of the raster libraries provide their source code. This is an extremely important point that cannot be overemphasised. As a general rule of thumb, developers should stay away from making any local edits to a library they are using, however, there will usually be situations where a change will need to be made. With the source code this isn’t a problem but care must be taken to port the change to later versions of the library. Without the source code this turns into a big issue that slows development down and, in the worst case situation, can lead to replacing the library.

Bad: Pixel perfect scaling issues

Pixel perfect scaling for raster libraries can be a real pain. When using libraries like Daikon Forge and NGUI you’re able to turn pixel perfect on by a click of a checkbox, however, this won’t scale yet. You’ll need to combine this with anchors to ensure that the position is correct. It can take a bit of playing to get things right from my experience.

Why do you want a scaled pixel perfect UI? Without being pixel perfect you’ll have a blurry interface on anything except the designed for aspect ratio and resolution. Without scaling then the UI will seem too small or large depending on the resolution being used vs. the designed resolution.

If you are developing a game for mobile and desktop platforms then alternative images may be required for different devices based on resolution requirements. If this is the case then it’s common for sprite atlas and texture swapping to be taken into account.

Bad: Aspect ratio issues

Things tend to get worse when scaling with aspect ratios. Your UI design may be thrown completely out the window if you haven’t taken care to incorporate the supported aspect ratios. A major problem with this is UI stretching. For example, making use of anchors to achieve a scaling UI designed for a 4:3 ratio will cause a lot of stretching when playing in a 16:9 resolution unless a lot of care is taken.

Anchor systems differ considerably from Daikon Forge and NGUI (NGUI v2 and the new NGUI v3+ anchors) and in our case we developed custom anchors to help fill the gaps in functionality.


Vector System (Scaleform, NoesisGUI)

The vector based libraries that exist for Unity are a mixture of third party tool designer based and pure code based systems. A more code based approach may appeal to some developers more than a designer based approach so it’s something to consider along with the following points.

Good: Pixel perfect scaling

The better vector based libraries will handle runtime vector loading instead of buildtime vector loading. This means scaling will always be pixel perfect with very little effort on the developer. Compared to raster libraries this could save a fair amount of time and effort. Aspect ratios are still a problem but removing pixel perfect scaling from the situation makes things easier.

Good: Image sizes

Vector art have smaller file sizes than raster art due to vectors being mathematical formula based. If building a game for a platform that has limited file system space or there is a requirement to keep final build size as low as possible then a vector based system will help. Generally it won’t help in terms of memory usage as the vector art will use more memory the more complex it is and it tends to effectively draw a bitmap based off the vector data.

Bad: More expensive in price

If using a Unity library for vector UI then the prices are generally at least twice as much as the next best raster based UI library. The libraries are around the range of £250 so, for a business, this isn’t too much in reality. If your budget can cover this then it’s not a problem.

Bad: Closed source code

As explained above, not having the source code for a library can cause some major problems later in the development process. You’ll usually find the source code is available for these libraries but it’s usually for a large cost and must be negotiated for.

Bad: Cross-platform support issues

Support for multiple platforms, especially Linux, tends to be lacking. Devices like Oculus Rift aren’t supported and NoesisGUI doesn’t support consoles yet.

Neutral: Third party tools for designing layout

Scaleform uses Adobe Flash Studio (and I think a few other tools support it too) for designing the UI and this leads to a flash based UI.

NoesisGUI uses XAML and this can be hand coded or designed using Visual Studio.

While these two points aren’t really bad it does lead to reliance on more tools, some of which you have to pay for. If taking the XAML route then this isn’t a problem as you can hand code the design (or visually design it in Visual Studio) then view the UI in Noesis’ viewer. It’s just more points to be aware of.


Closing

So, as you can see there is no real right or wrong choice (or at least that’s my opinion). Whether you develop a bespoke system or use one of the two types of libraries, make sure it matches you and your team’s approach, resources and requirements.

For the next article I’ll go into what UI framework we chose and how we addressed the problems and questions raised above. If you have any questions, want to debate or just to share your experiences – grab me on Twitter at @CWolf.

Thanks for reading! 🙂

Interfacing with UI #4 – Coherent UI

February 5th, 2016

This is part of a series of posts revolving around user interface design and development, the introduction and links to the other posts can be found here. Last I wrote about user interfaces I discussed the new Unity UI system and I wrote about our process of porting from Daikon Forge to it. That was a year and a half ago and a lot has changed since then. To keep things interesting we decided to move from Unity UI (yet another move?!) to Coherent UI and I’ll explain why we did it. Why Move… Again?!... (read more)

@SolitudeGame: Status update: Fuel reserves low. Asteroid mining facility detected on sensors. No response to our communications. On approach station appears to be abandoned and running on emergency power only. Away mission approved. Mission objective: Search and salvage - fuel is a priority.

23/03/2022 @ 11:00am UTC

@RogueVec: And so it begins! #RebootDevelop

19/04/2018 @ 8:05am UTC

@RogueVec: We'll be at @RebootDevelop this year. We can't wait! If you want to hang out just give us a shout! #RebootDevelop2018 #GameDev

16/04/2018 @ 12:06pm UTC

@SolitudeGame: Fullscreen terminals allow you to hook into your ship's guns for fine control! Moddable gun modules, terminals and UI! https://t.co/B5N01jrA70 #GameDev

8/12/2017 @ 4:58pm UTC

@CWolf: Woo! And, now we have a cross-compiled (nix --> win64) @SolitudeGame server in our build and deploy pipeline #RV #GameDev

28/11/2017 @ 3:39pm UTC